Football pitch renovation guidance
Preparing for end of season renovations....
- Plan as early as possible, for spring renovations having them planned in by January is good practice but earlier the better.
- Create a plan of what you want to do and when, think about what you're trying to achieve by your pitch renovations. Improving grass cover, drainage, surface evenness etc.
- Most clubs and organisations will be looking to carry out these works at similar times so book your contractor, materials or equipment hire early to avoid disappointment.
- If you have completed PitchPower inspections use your report for guidance. You can share it with contractors to help inform quotes and work plans.
- Have an idea of how long you can keep your pitch out of use for, or maybe you cant.... this will help inform the timing and nature of the tasks that can be completed.
Gradually mowing the grass down shorter in the weeks preceding renovations will help to facilitate effective works.
- Prior to carrying out renovation works to pitches that involve any of over-seeding, top-dressing, scarification and fertilisation it is good practice to make sure the grass is mown down to an appropriate height between 15-20mm if possible.
- Mark up any services, pitch corners etc
- Get a head start on any worn or low lying areas
- Consider a soil analysis early spring before renovations
- Consider where materials might be delivered and stored
Sequence of works and renovation tasks.
The sequence of works for pitch renovations can vary depending on what we are trying to achieve the following should only be used as a rough guide.
Preparation
- Mow pitch to between 15-20mm, do this gradually over a few weeks leading up to renovation time.
- Mark up services and pitch corners
- Consider a soil analysis early spring before renovation
- Consider where materials might be delivered and stored
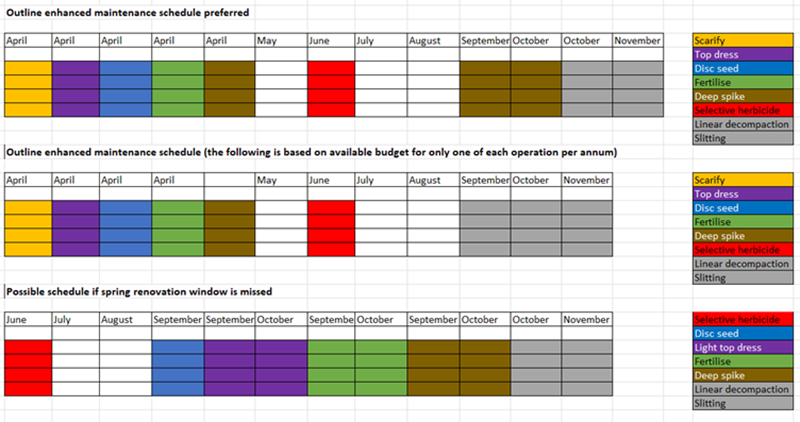
Within a 1-4 day window;
- Scarify and remove arisings
- Top dress and brush/drag matt in
- Over-seed
- Deep spike
- Fertilise
After establishment;
- If required following IPM selective weed control (6-8 weeks after seeding) (Must be applied by a professional with the appropriate certification)
Pitch renovation tasks explained
You can find out more information on the how and the why of each task listed in our other learning cards dedicated to each task. The below provides brief detail.
Scarification – Ideally a tractor mounted scarifier should be used, gather quotations based on three directional passes. Please be cautious with scarification of turf on sites with no means of irrigating the pitches also think about how long you have before the pitches are back in use. Consideration should be given to how straight forward it will be to re-establish the playing surface. It may be necessary to reduce the amount of directional passes or consider use of tractor mounted rakes or chain harrows if irrigation and resources to re-establish the pitch are not readily available. Whatever method employed the debris must be removed from the pitch surface.
Top-dressing – Make sure any materials used are compatible with your indigenous soil, if dressing localised areas (goal mouths) using a pan shovel to apply little and often is best practice and will avoid smothering the grass. Always keep dressing dry prior to applying and apply and brush/drag matt in when dry.
Over-seeding – Disc seed in 3 directions at a rate of 35 grams per square metre approximately 10-12 x 20kg bags of Perennial Ryegrass seed for a full-size pitch (you may need to increase or reduce the rate depending on your grass coverage)
Vertical tine de-compaction (Deep Spiking) – Using a vertical action machine equipped with 18-24mm solid tines, at no more than 100mm spacings to the maximum achievable depth no shallower than 150mm.
Or
Linear decompaction – Avoid on clayey soils outside of the autumn/winter where irrigation is not readily available, if the surface is too dry this can cause cracking when the clay content of the soil shrinks on drying.
Slitting (aeration) – Surface slitting similarly to powered tractor mounted linear decompaction will create slits in the soil that are susceptible to cracking again this should be considered as an Autumn/Winter operation where irrigation is not readily available. Slitting does not replace the more invasive decompaction offered by either deep spiking or linear decompaction.
Application of fertiliser – Either make use of a dedicated pre-seeder fertiliser if budgets allow followed by a controlled or slow release 3-6 weeks later or if budgets are limited to one or two applications a year a controlled or slow release fertiliser should be applied after seeding evenly at a rate of 35 grams per square metre (approximately 10-12 x 20kg bags) per full size pitch, using a pedestrian or tractor mounted distributor. Equipment should be calibrated before use and cones, poles, flags etc should be used at either end of the pitch to ensure accurate application. Apply when dry and little in the way of wind but ensure persistent rain/irrigation is expected within 48 hours.
Application of Selective Herbicide – If required as part of an Integrated Weed Management Programme selective herbicide should be applied by a fully qualified professional with the appropriate equipment and paperwork. It should not typically be applied any sooner than 6-8 weeks either prior or after seeding (refer to product label) Typically mowing should not take place for 3 days before and 3 days after application. (Do not apply in drought conditions it may damage the turf and will not treat weeds effectively) Selective herbicides should be sprayed in the dry with little to no wind. Most selective herbicides are rain fast within 24 hours of application. If rain falls prior to this it could affect the success of weed control.
Points to consider...
- All contractors have favoured ways in which to carry out certain works, so the above should be used as a guideline order of works.
- If you are having scarification carried out please consider how you will manage the arisings removed, removal from site can add significantly to the costs of the operation and should be discussed with the relevant contractor.


 Tweet
Tweet